Making pipes and their accessories
Task
Create two pipes, two front caps, two rear caps, two thermal
shields, and four slide covers.
Material needed
- 8-terminal and 6-terminal wire nuts
- 30cm of 4mm^2 insulated hard copper wire
- Smoke pipe
- Four smoke pipe caps
- Thin tin or durable plastic for the hoods
- Primer paint
- Top coat paint
- A piece of paper to wrap around the pipe for marking angles
- Two lenses
- Two 6mm cable bushings and seven 8mm cable bushings (they are numbered
according to diameter of cable that can be put into them).
- self-cutting screws 3.9x>=12mm
- self-cutting screws 3.9x>=6mm
- M3x15 bolts
- M3 nuts
- M4
- Sillica gel
- Sewing thread
- A small piece of old fabric
It is necessary the diameters of the lens and caps is as follows:
lens_diameter<=cap_diameter-15mm.
Action
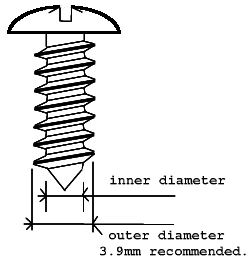 |
Take the self-cutting screws and measure screw_big_hole as the outer
diameter of the thread on the self-cutting screw+0.2mm and
screw_small_hole as the inner diameter of the thread on the
screw-0.2mm. |
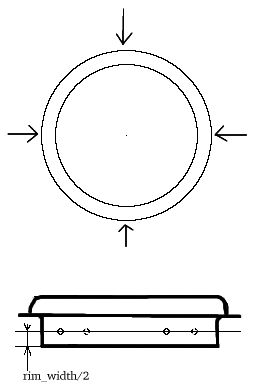
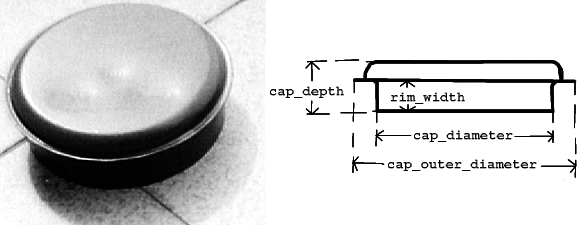 | Take the smoke pipe cap. Measure
cap_depth, rim_width, cap_diameter, cap_outer_diameter. Take the smoke
pipe and measure the average diameter smoke_pipe_nominal (it should
be the same as the number under which it was sold to you).
|
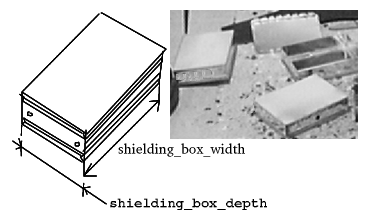 | Take the shielding box.
Measure shielding_box_depth and shielding_box_width.
|
 | Take the lens and focus an image of distant
object on horizon seen through an window onto a wall. Ask someone to
measure the focal_length on two opposite places on the rim of the lens.
Average them and this is the focal_length. Compute pipe_length as
focal_length-cap_depth+rim_width+shielding_box_depth+rim_width+14. |
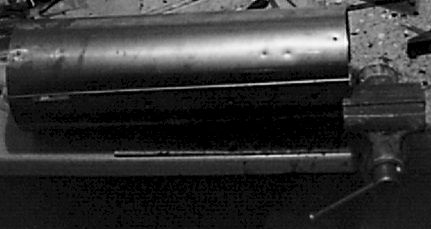 | Cut two
pipe_length's from smoke pipe using a metal saw. |
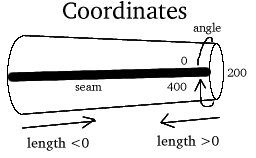 | In the next, we will describe coordinates on a cylinder - by angle and
length from one edge. Drill both cylinders (smoke pipes) in the same
manner. Measure length so that positive lengths are measured from the
narrower end of the tube and negative lengths are measured from the
opposite end. Measure angle so that zero is on the seam of the tube. First
comes angle in grads (from 0 to 400), then offset in
milimeters. |
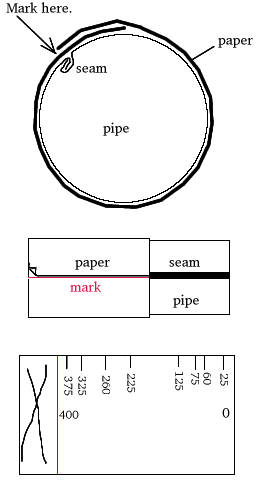 |
Use a sheet of paper wrapped around to measure the angle.
Wrap the paper around
and make a circumference mark where the edge is. Then put the paper on
desk and divide the circumference by 400 and make marks at 25, 60, 75,
125, 225, 260, 325, and 375 times this distance. Mark them 25grad, 60grad,
75grad, 125grad, 225grad, 260grad, 325grad, 375grad. Use calculator. Then
wrap the paper around again, the seam of the paper on the seam of the
tube, and copy the marks from the paper onto the tube as necessary. that
diameter of the tube is not constant, smoke pipes are slightly conical, so
recalibrate the marks for each set of holes.
|
Compute rim_offset as rim_width/2-3. Compute front_slide_offset as
focal_length-cap_depth+rim_width+2. Compute rear_slide_offset as
front_slide_offset+shielding_box_depth-16.
Drill these holes:
| Angle | Axial Offset | Hole
diameter | Purpose of the hole |
| 25grad | rim_offset | screw_big_hole | Holds
front cap |
| 125grad | rim_offset | screw_big_hole | Holds
front cap |
| 225grad | rim_offset | screw_big_hole | Holds
front cap |
| 325grad | rim_offset | screw_big_hole | Holds
front cap |
| 25grad | -rim_offset | screw_big_hole | Holds
rear cap |
| 125grad | -rim_offset | screw_big_hole | Holds
rear cap |
| 225grad | -rim_offset | screw_big_hole | Holds
rear cap |
| 325grad | -rim_offset | screw_big_hole | Holds
rear cap |
| 60grad | front_slide_offset-10mm | 4.1mm | Future
slide path |
| 260grad | front_slide_offset-10mm | 4.1mm | Future
slide path |
| 60grad, | front_slide_offset | 4.1mm | Future
slide path |
| 260grad | front_slide_offset | 4.1mm | Future
slide path |
| 60grad | front_slide_offset+10mm | 4.1mm | Future
slide path |
| 260grad | front_slide_offset+10mm | 4.1mm | Future
slide path |
| 60grad | rear_slide_offset-10mm | 4.1mm | Future
slide path |
| 260grad | rear_slide_offset-10mm | 4.1mm | Future
slide path |
| 60grad | rear_slide_offset | 4.1mm | Future
slide path |
| 260grad | rear_slide_offset | 4.1mm | Future
slide path |
| 60grad, | rear_slide_offset+10mm | 4.1mm | Future
slide path |
| 260grad | rear_slide_offset+10mm | 4.1mm | Future
slide path |
| 75grad | 40mm | screw_small_hole | Holds
hood |
| 375grad, | 40mm | screw_small_hole | Holds
hood |
| 75grad | 70mm | screw_small_hole | Holds
hood |
| 375grad | 70mm | screw_small_hole | Holds
hood |
| 25grad | rim_width+7mm | 5.3mm | Mounts pipe on
the holder's heel |
| 25grad | rim_width+77mm | 5.3mm | Mounts pipe on the holder's
heel |
If the focal length is longer than 204mm drill also this:
| Angle | Axial Offset | Hole
diameter | Purpose of the hole |
| 25grad | rim_width+147mm | 5.3mm | Mounts pipe on the holder's
heel |
If the focal length is longer than 274mm drill also this:
| Angle | Axial Offset | Hole
diameter | Purpose of the hole |
| 25grad | rim_width+217mm | 5.3mm | Mounts pipe on the holder's
heel |
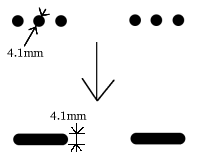 |
Connect holes
in each group of three holes marked for future sliding path together to
form a sliding path for the screws. Use a tiny file or fret-saw to
accomplish this. |
 |
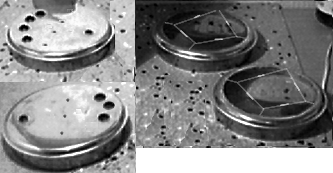
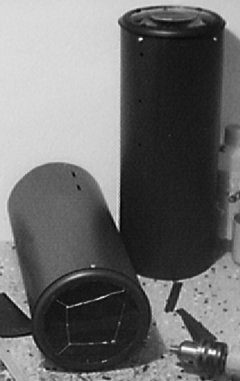
Remove any rust from the pipe (outside and inside) with emery paper. Wash
any traces of fat from the pipe using detergent, water and handbrush or
old toothbrush. Dry the pipe completely. Now the pipe should look as on
the picture. |
 |
Now we will manufacture the four caps: two front ones, one rear
receiver and one rear transmitter cap. |
 |
Take all four caps and for each cap, drill four screw_small_hole holes
rim_width/2 from the edge, symmetrically around both caps' rim (each cap
will get four holes). Use the sheet of paper to measure the diameter,
make the marks and transfer them to the cap. Be precise, otherwise you
will have problems screwing the caps into place. |
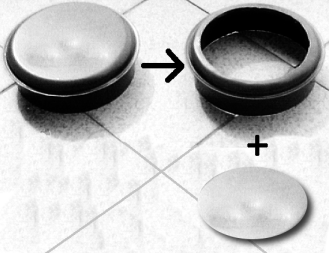 |
Take two caps. Make a mark in the center of the outer side using the
hard stylus and hammer. Place compasses into it and set compasses radius
to lens_diameter/2-1mm. Draw a circle. Make the circle more visible by
redrawing it using the marker pen. Put a block of wood into a vice and the
cap over it, the rim down. Use cold chisel and hammer to chisel out the
curve. Then the round piece will fall out. Collect it, it will be the so
called thermal shield. Use the hammer to repair the face of the cut on the
wooden block. |
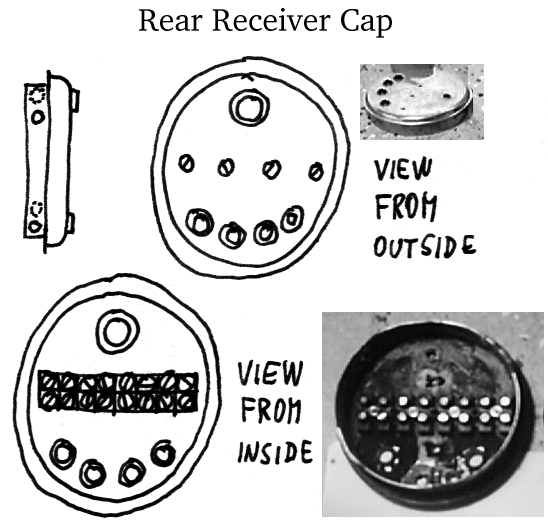 |
Now we will make holes for the wire nuts and cable glands in the rear
caps. Take the rear receiver cap. Take a 8-terminal wire nut and place it
inside the cap, so that it points in a direction between two opposite
holes on the rim. Drill a 3.1mm hole between terminals 1 and 2, 3 and 4, 5
and 6, 7 and 8. Drill one 8mm hole on one side of the wire nut and four
10mm holes on the other side.
them. |
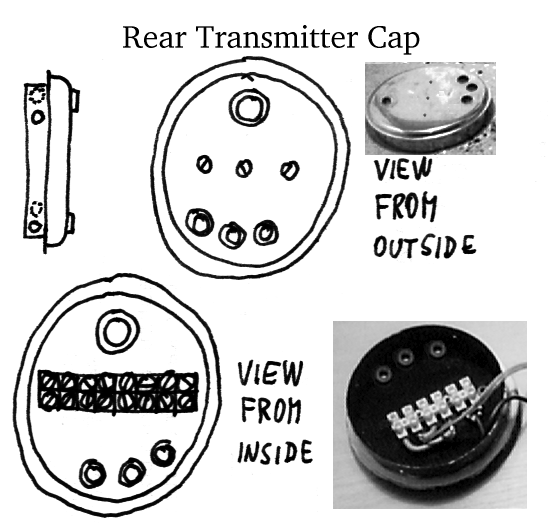 |
Take the rear transmitter cap. Take a 6-terminal wire nut and place it
inside the cap, so that it points in a direction between two opposite
holes on the rim. Drill a 3.1mm hole between terminals 1 and 2, 3 and 4, 5
and 6. Drill one 8mm hole on one side of the wire nut and three 10mm holes
on the other side.
|
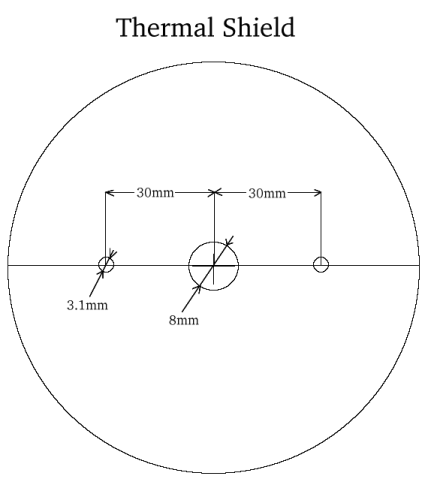 | Now we
will make two thermal shields. Mark a straight line across the thermal
shield, going throught the centre. Mark two holes, each 30mm from the
centre, on the line. Drill the centre out with a 8mm drill and the holes
each with 3.1mm drill. |
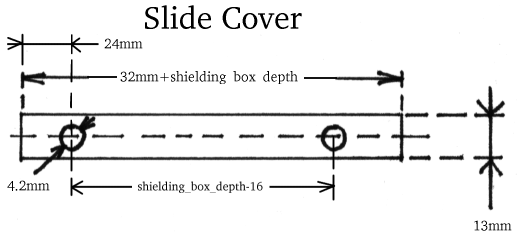 |
Make four slide covers from any scrap tin, 13mm wide and
32mm+shielding_box_depth long. Drill two screw_big_hole
diameter holes on each cover, shielding_box_depth-16 apart,
24mm from the end. |
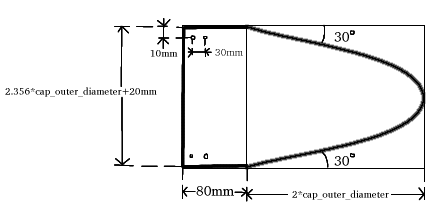 |
Cut two shapes from the hood tin (or plastic foil) as specified on the
drawing. Drill screw_big_hole through it as specified in the drawing.
|
Use emery paper to remove any
rust from the surface of pipes, caps, thermal shields, hoods, and slide
covers. Use detergent and water to wash out every trace of fat from the
surface of pipes, caps, thermal shields, hoods, and slide covers. Do it
really thoroughly, otherwise the paint will have reduced lifetime. Dry out
caps, pipes, thermal shields, hoods, and slide covers with the dry rag. The
pieces should be so clean they leave no smudges on the rag.
Clean the lenses thoroughly using
detergent, warm water, and dry them with a clean dry rag.
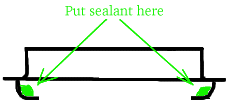 |
Place a fair amount of the sealant inside both front caps, into the
corner
where the lens will sit, but not on the edge on which the lens will sit.
|
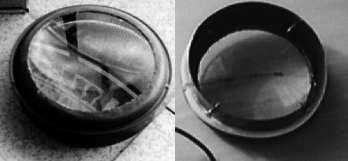 |
Put the lens into the place from inside the cap and shape and finish the
sealant with your little finger so that it becomes smooth and flawless.
Take a great care not to smudge the lens. Do not place the sealant on the
outer side of the lens.
If you have smudged the lens and decreased clear aperture, wait
until the sealant partly solidifies and then remove it mechanically and
clean the remaining haze with a rag and acetone. Removing the hardened
selalant is not easy and must be done using a razor blade, without
scratching the lens. |
 |
Put cable bushings into the holes in rear caps: 6mm bushings into 8mm
holes and 8mm bushing into 10mm holes. Seal them all against the cap from
both sides with the sillicone sealant. |
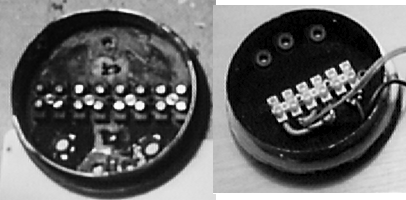
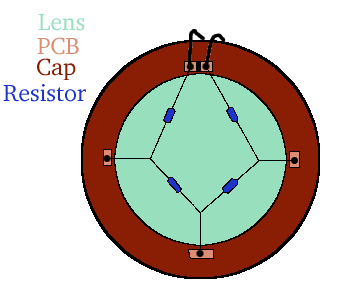 | Wait until the
sealant solidifies on all caps. Now we will furnish both front caps with
heating network. For each cap, cut four small pieces of PCB blank and cut
the copper on one side of one piece into two pieces insulated by a gap.
Solder these pieces regularly on the outer rim of the lens, on the tin.
Each piece goes near one hole for screw that is already there. Solder the
resistors there as specified in the drawing, connecting them to the rim
with pieces of bare wire. Check that there is no short circuit between the
network and the metallic cap itself. Wash both caps again with detergent,
warm water and dry them into the clean dry rag. Cut two pieces of
two-conductor 1.5mm^2 insulated cord, pipe_length+100mm long. Soler each
one on the terminals of the heating network. |
Now we will paint with water-soluble primer. Paint only those parts of
the specified list which are able to corrode, i. e. they are from raw steel or
iron and are not galvanized nor tin-plated. Paint caps, pipes (including
inner surface), hoods,
slide covers, and thermal shields with water-soluble primer. Wash out the
brush in a sink. Leave the caps, pipe , thermal shield, hoods and slide
covers to dry. Paint the same things with another layer of water-soluble
primer. Wash out the brush in a sink. Leave the caps, pipe, hoods, thermal
shields, slide covers to dry.
Now we will paint with water-soluble matte black top coat. Paint all
surfaces including those that do not corrode. Paint caps, pipes (including
inner surface), hoods, slide covers, and thermal shields. Wash out the
brush in a sink, leave the stuff to dry. Repeat once more to make another
layer of water-soluble matte black top coat. Leave the caps to dry. Prick
out the paint from all the holes on caps, pipes, hoods, slide covers, and
thermal shields using something sharp.
|
Screw the wire nuts
into their apropriate places using the M3x15 screws and M3
nuts. |
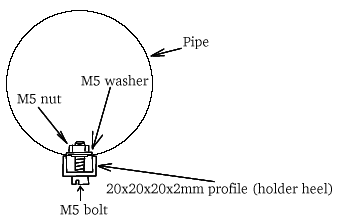 |
Attach the pipes to the heel of your holders using 4-8 M5 bolts, 4-8
M5 nuts and 4-8 M5 washers (depends on focal length). Mount is as in the
picture, tighten firmly. |
Screw the hoods in place using
eight galvanized M4 washers and eight self-cutting screws 3.9x>=6mm
 |
Screw the front caps into both pipes using four self-cutting screws
3.9x>=12mm for each pipe. Seal the front caps against the pipe,
including the screws, with sillicone sealant. |
 |
Divide the sillica gel into two equal parts and sew small bags from a
piece of old fabric. Put the sillica gel into them and sew them up. Put
them into oven (at minimum heat) for an hour unless you are sure the
sillica gel is completely dry.
Store the bags in a sealed plastic bag or container.
The caps, pipes, and slide covers are ready at the moment.